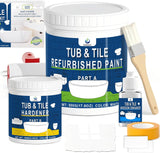
XUDOAI Bathtub Refinishing Kit Gloss White 21.5oz Tub Paint Reglazing, Tub and Tile Refinishing Kit with Tools, Tub and Tile Paint for Bathroom/Kitchen/Shower/Porcelain/Sink/Ceramic
Purchase through Amazon:
USA: www.amazon.com/dp/B0D3LXC5ZG
CA: www.amazon.ca/dp/B0D3LXC5ZG
UK: https://www.amazon.co.uk/dp/B0D3LXC5ZG
DE: www.amazon.de/dp/B0D3LXC5ZG
FR: www.amazon.fr/dp/B0D3LXC5ZG
IT: www.amazon.it/dp/B0D3LXC5ZG
ES: www.amazon.es/dp/B0D3LXC5ZG
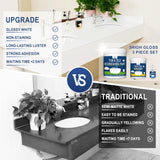
- Tub Refinishing Kit Gloss White: Bathroom tile paint is formulated with water-based acrylic resin, which can be used on bathtub and sink surfaces with good adhesion. Bath tub paint kit is fully cured to obtain a gloss white smooth and delicate surface without worrying about staining and residual stains
- Ceramic Tile Paint Refinishing Kit: Our tub refinishing kit is suitable for beginners or experienced people. 500 g/17.5 oz (part A), Hardener 100 g (part B), Adhesion enhancer 10 g (part C), gloves, masking tape, roller brush (replace sponge roller), brushes. The rich sink refinishing kit can complete home or commercial refinishing repairs
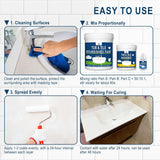
- Bathtub Paint Easy To Use: Pour the Hardener (Part B) and Adhesion enhancer (Part C) into Part A and mix for about 60 s. Use a brush or roller to apply it to the bathtub, sink or tiles, and it will be fully cured in 24 hours. Shower paint provides the fastest curing bathtub, countertop, or tile refinishing coatings, reducing the wait time for application
- Tile Paint Kit Bathroom Wall Use Scene: Tub tile refinishing kit offers gloss white refinishing paint for bathroom, kitchen, living room, tub, sink, countertop, tile surface refinishing or color coverage. It is suitable for family house, apartment house or commercial house refinishing
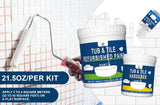
- Tub Paint White Waterproof Tips: It is recommended to use in a dry, ventilated environment, pay attention to hand and mouth and nose protection. On a flat surface, Single application: 3-4 m2 (32 to 43 sq. ft). On a flat surface, Double application: 1-2 m2 (10.7 to 21.5 sq. ft) For renovation on light colored items, one coat is sufficient. To renovate on dark colored items, such as black, apply in two coats.
| * | 1. Before use, please browse the product information, such as the product detail page, video, product box instructions. |
| * | 2. Single application: 3-4 ㎡ (32 to 43 sq. ft). If the item you are renovating only needs to be applied once, and the application area needs to use the entire kit. Pour Part B (curing agent) and Part C adhesion enhancer into the jar of Part A (refurbished paint), slowly stir for more than 60 seconds to ensure even mixing. It is recommended to use them up within 1 hour. If bubbles appear above, please eliminate or remove them in a timely manner. |
| * | 3. Single application: 3-4 ㎡ (32 to 43 sq. ft). If the item you are renovating needs to be applied twice, and a single application requires the use of a complete bathtub renovation kit. Suggest purchasing 2 or more sets of bathtub renovation kits. According to the usage steps, please note that there should be a 24-hour interval between the two layers of application. |
| * | 4. Double application: 1-2 ㎡ (10.7 to 21.5 sq. ft). If the item you are renovating needs to be applied twice, and the bathtub renovation kit meets the area for two applications. Find a suitable container and mix it according to the ratio of Part A: Part B: Part C=50:10:1. Slowly stir for more than 60 seconds to ensure even mixing. It is recommended to use it up within 1 hour. If bubbles appear above, please eliminate or remove them in a timely manner. |
| * | 5. If divided into two parts according to proportion for use. The remaining part A, part B, and part C should be cleaned of any overflow marks from the bottle mouth and sealed with an inner lid. Store in a dry and dark environment, and apply a second layer after 24 hours. The evenly mixed portion needs to be used up within 1 hour. |
| * | 6. Cannot be diluted with other products. Avoid contact with hydrochloric acid, galvanized steel or flexible plastic. Do not use abrasive and oxidizing cleaners on cured surfaces, and contact between sharp objects and surfaces is not recommended. |
| * | 7. Any debris or residue will affect the adhesion effect as well as the leveling. Debris, bumps, rust, etc. can be cleaned off using a cleaner or sandpaper. Then rinse the surface with water and once dry, wipe the surface with a tack cloth to catch any remaining particles. |
| * | 8. Whether you need to refinish or cover in color, you need to make sure the surface is somewhat rough to encourage the tub paint to penetrate. Using a tile surface preparation, acid cleaner or sandpaper to obtain good adhesion. |
| * | 9. Use masking tape to protect hardware, drain openings or areas that do not need to be painted. Showerheads, etc. can be sealed with baggies. If you are concerned about spills or splatters during application, you can lay cardboard, plastic wrap, etc. on the floor. Paint thinner or isopropyl alcohol can be used to remove traces of residue. |
| * | 10. Apply the coating in a uniform and overlapping manner. Avoid dipping too much at once to prevent sagging. Avoid excessive brushing or rolling to prevent stripes and accumulation marks. If necessary, use a brush to repair corners and edges. |
| * | 11. Pay attention to the bottom and sides during mixing. If the material is not adequately mixed, in some areas the material will not harden and over time these areas may eventually yellow and flake off. In some areas, mixing with too much hardener results in the formation of small particles. |
| * | 12. After the application is completed, dry naturally in the air flow environment for 24 hours, at this time you can contact with water. Wait for another 24 hours and then you can start to use it. Temperature, humidity will have a certain effect on the curing time and curing effect, to ensure that completely dry into a film before use. |
| * | 13. Part A cans have extra space for mixing and stirring and relieving squeezing pressure, and part B cans have extra space for relieving squeezing pressure. |


